Part Three: Centering and Tuning

What does “Tone Centering” mean, and how do you do it? Recapping from Part One, a “centered” sound is a balanced tone containing the full complement of overtones available in a instrument – a “bright/dark” sound with both highs and lows. Producing this sound requires the correct frequency, a properly trained embouchure and an active air column.
Every note we play has a specific “space” – a range of frequencies – available for the buzz to resonate in the instrument. This is the space between the harmonic “walls,” the “slots” where a note is produced. The pitch may be sharp or flat, but it is still considered to be a specific note. Above and below this space there exists a wall that divides the note from the next harmonic slot. Our practice of “lip slurs” is an exercise in effectively reacting with these walls and slots. Centering involves adjusting the buzz frequency to match the length of tubing so that optimum sound quality is produced – the resonant “bright/dark” sound described in Part One. When the buzz frequency is properly aligned there is room in the available space for the full complement of overtones. If the buzz frequency is misaligned or if the space itself is compromised, the tone will be affected.

The drawings to the left are representations of proper and improper sound centering. The large circle in the top diagram shows the space available for a given pitch. The small white circle in the center represents a properly centered buzz. The outer orange area represents overtones emanating from the fundamental pitch. A centered buzz allows room for the full overtone series to resonate in the circle or note-slot (see Part One).
Below we see representations of two common errors. The bottom left shows what happens when the space is compromised by a constricted aperture or “pinching”. The area that was previously available above and below the buzz frequency has been squeezed and the overtone vibrations are dampened. The constricted aperture is also largely responsible for the “ewe” sound frequently heard in beginning trumpet classrooms.
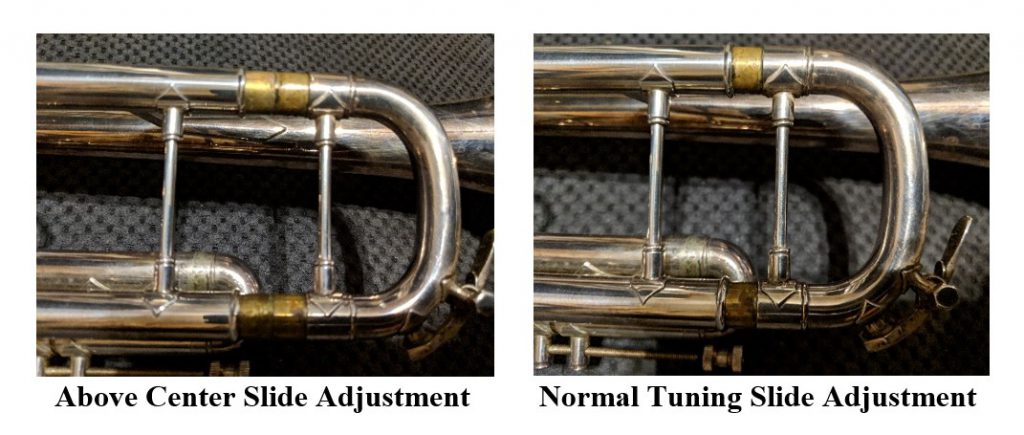
The bottom-right shows a common trumpet malady among developing players – playing above center. Here the buzz is pushed against the upper wall thus dampening vibrations in that area of the note space. While playing in this manner may provide a sense of security in “feeling” where the note is (the wall), significant problems arise with intonation, endurance, accuracy and response. To quote Vincent Bach,
If a player gets into the habit of playing constantly above center by pulling out the tuning slide too far, he will not have enough leeway to adjust the fifth harmonic higher above center in order to play in tune; also the sixth harmonic, which is already too sharp, will be pinched still higher and therefore too sharp. Such a player will be constantly in trouble with his intonation. – Vincent Bach, The Problem of Tuning Correctly, 1959
Does this sound familiar? High school and college trumpet players commonly show up to rehearsal with tuning slides pulled out abnormally far to compensate for playing above center. Their high G’s are still unbearably sharp, and they often resort to using alternate fingerings on top-space Es. The tone quality is thin, edgy and lacking in resonance. Pulling the slide may help some with intonation, but ultimately this only enables incorrect playing. Correcting the problem at the source is a much better solution.

Tune the Tone
Finding the center of the sound requires careful attention to the fundamentals of tone production discussed in Part Two. Once the air and embouchure are working together efficiently, the next step is to find the frequency that causes the sound to resonate properly. This is the “sweet spot” where the tone seems to come alive sounding richer and louder on its own. Begin with an easy note in the middle register – 2nd line G. Slowly bend the pitch up and down through the various parts of the note-slot listening more for variance in tone and volume than the changing pitch level. Notice how the sound gets duller and loses resonance as the pitch rises to press against the slot’s upper wall. Moving back the other direction, the sound gets louder and fuller as it gets lower before finally becoming unstable and “blatty” in the lowest parts of the slot. Explore the full range of sounds listening for the pitch level where the sound has the most resonance. This will be a clear sound with both highs and lows, and it should sound noticeably louder than other parts of the note. Most players find this spot is somewhat lower than expected – almost flirting with instability. Once resonant tone is achieved, check it with the tuner and adjust the slide accordingly. Tune this tone (not the out-of-center tone), and learn to play in this area of the sound in all registers. This is the tone the trumpet was designed to make. Playing in this way allows the air and buzz to work in harmony with the laws of acoustics in the trumpet. Along with sounding better, the improved efficiency helps with range and endurance, and since the buzz is now focused in a larger area of the note-slot, accuracy will also improve.
Randy Adams is Professor of Trumpet at Sam Houston State University where he has taught since 1993. He served as Houston Symphony Orchestra Interim Trumpet for the 2001-2002 season and has been a member of the Houston Grand Opera Orchestra since 1984. SHSU trumpet students have placed in the top five in the National Trumpet Competition’s Trumpet Ensemble division, two SHSU students have played Lead Trumpet in the Disney College All-Star Band and graduates have gone on to play Lead Trumpet in the UNT 1:00 Lab Band and sub with the Houston, Dallas and Pittsburgh Symphonies.
